Exporting Google Earth Mesh with EarthStudio
- May 5, 2025
- 2 min read
Updated: May 25, 2025
Sample Titles: Export Google Earth 3D Mesh to GLTF, FBX, OBJ: A Complete Step-by-Step Guide
Everything You Need to Know About Google Earth 3D Mesh Download for BIM and Game Design.
Key Words: “Google Earth 3D Mesh,” “BIM,” “GLTF Export,” and “Earth Studio.”
Real-world 3D mesh data is revolutionizing workflows across architecture, game development, and digital twin applications. Traditionally, obtaining accurate terrain or building geometry from
satellite sources involved expensive software, slow workflows, or unreliable scraping methods.
Earth Studio changes that. With a simple browser-based interface, you can search, fetch, and export high-quality Google Earth Mesh in just minutes. Whether you're designing an urban model in Blender, importing terrain into Unreal Engine, or running a planning simulation in Revit, Earth Studio makes geospatial 3D data accessible and efficient.
If you've ever struggled with manually reconstructing terrain or downloading inconsistent data from fragmented sources, this guide is for you.
In this post, we’ll show you exactly how to go from a raw idea to a fully exported 3D mesh file.
Choose Format & Download
Once your region has been fetched successfully, you're ready to export the mesh data into a format suitable for your workflow.
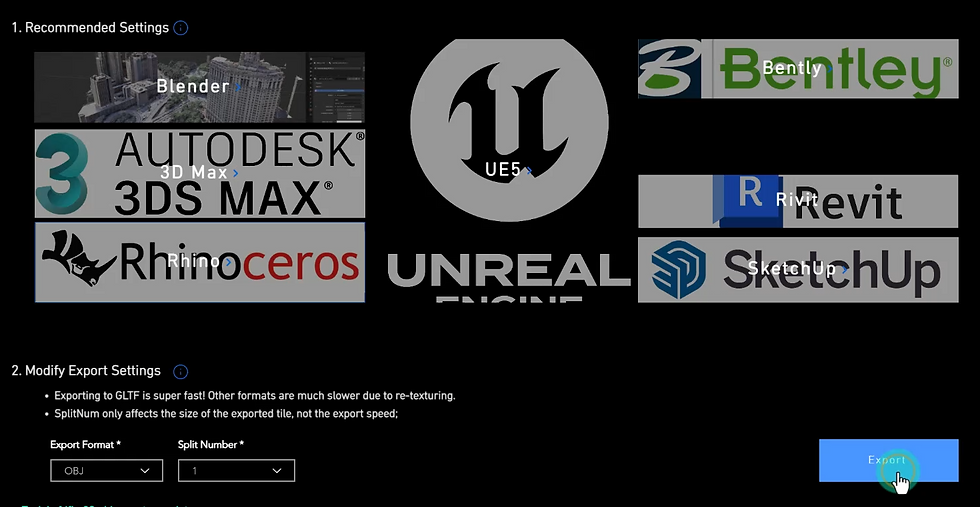
Heading #1: Use a Recommended Preset
Heading #2: Or Customize Your Export
Heading #3: Start Export Process
Heading #1: Use a Recommended Preset
Choose from presets tailored for Blender, Unreal Engine, Revit, or Unity.
Each preset applies optimal settings for that platform, including file format, tile splitting, and performance tuning.

Heading #2: Or Customize Your Export
Manually select the file format: GLTF, FBX, OBJ, or DAE.
Set the number of splits to control how the mesh is partitioned.
Choose an export strategy (auto, split-by-tile, full merge) to match your pipeline.

Heading #3: Start Export Process
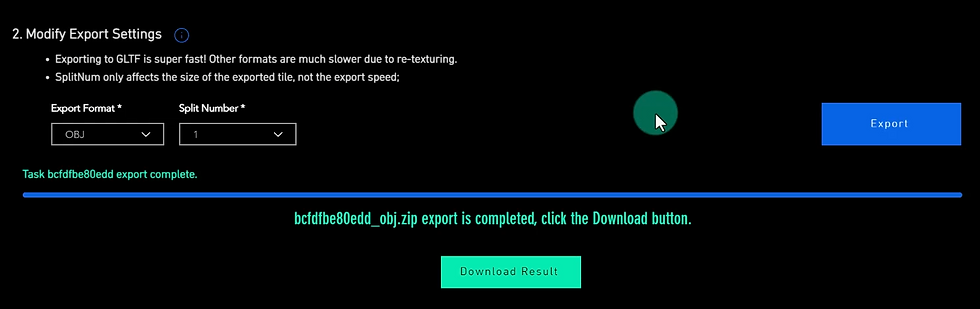
Click Export to initiate the process.
Once complete, a Download button will appear. Export files are temporarily hosted—please download them promptly.
⚠️ Export Notes
Is exporting again charged? No. As long as the region has already been fetched and remains within the task’s validity period, re-exporting in a new format or with new settings is free of charge.
What if the download link expires? Don’t worry — simply re-export the task using the same or different settings. A fresh download link will be generated instantly.
Can I export multiple formats? Yes. You can export the same fetched region into multiple formats (e.g., GLTF for Blender, FBX for Unreal) or use different export strategies without fetching again.